End of 2009

Gosh.....2009 is coming to an end today. This year has been a good year for my handmade card business. Alhamdulillah a lot has improved when it comes to my card design. I have been working really hard this year to improve my card making skills and also when it comes to services for my customers. I know I have made mistakes before. I certainly have learn to not repeat the same mistakes again and do my very best to entertain my customer's requests.

I really appreciate all the support and encouragement from all of you who have been there for me in my good times and bad times. Please do continue supporting my work here. I welcome all comments, suggestions and critics from everyone. These will help me continue to improve in future.

Thank you again to all my loyal customers, to all my readers and to all who have visited Lin Handmade Greetings Card this year. May God bless you all with all the good things in life!

XOXO,
Lin

Pop up gift box and balloons!

HB047

This is the first time ever I made two different pop ups combined in one card! hehe! The actual plan was to do a pop up school boy, but in the end I decided to put the school boy on the outside where the wordings are. Gosh, it was so hard to do that! The school boy I mean.....I'm so not good at doing figurines. I tried my best and that's how it turned out in the end. :) I just didn't quite know how else to decorate the card with the boy on it....so I did what I usually do, which is doing that stripe pattern again! LOL! The stripe pattern is now kinda like a trademark for my cards. I just love doing it. My Mom on the other hand, is not loving it as much because I do it too many times it seems on my card designs. Oh well.....she's one of my critics now hahaha.....I don't always listen to her though LOL!!

The pop ups are a gift box and a few balloons coming out of the gift box.....errrmmm, well, it was meant to look like it came out of the box hehehe.....hope I achieved that somehow. LOL! I guess the pop ups are the part of the card that I love the most....especially the balloons. I don't know why I get so happy looking at them. Funny huh? I didn't do much decoration on the balloons except for just lining them with glitter glue. I really hope the boy loves it too! ;)

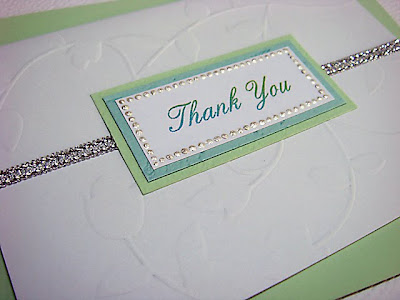
Cute thank you card...

SGC010

I made this thank you gift card for my aunt......she ordered a few of them to give away to her friends. I made a quick and simple card using white embossed paper. I love this paper because of the embossed design on it. :) No need to decorate too much on the card because the emboss is already considered as decoration.....hehehe!

Pop up hearts + flowers

HB046

I recently got me some new stock of paper, Lilac in color....so I decided to try out a new color combo. I think I've tried purple with moss green before but never mixed it with lilac. So I thought I would give it a shot and see how it turned out. I'm kinda unhappy with the photos here......the color does not really turn out as I want it to be because of the lack of natural light. I shot this in the evening, so obviously there wasn't enough light to see the true colors of the paper. Nonetheless, I gave it my best to capture the colors as close as I can get it.

I'm not really fully satisfied with this design and will probably redo it??? Urrrmmm, I donno, but for the time being, this is how it looks like hehehe.....and I love the new pop up I did. It's a V-Fold but I made a pattern out of it as you can see. Then I glued on it some colorful heart shapes, leaves and flowers. I just did it without thinking that much. Just kept on adding it bit by bit till its all filled up. :)

You Rock!!!

HB045

This card was made for an old friend of mine. His birthday was in November......I wished him on his birthday and then he requested a handmade birthday card from me.....YUP!!!...that was what happened and that's how this design came about hahaha :D LOL!!. This is the second request I got to make birthday cards from close friends. I made one already earlier and this is the second one I made. But I don't mind making them for people who knows how to appreciate art. :)

At first I didn't know what kind of theme I was gonna do or what kind of design I would come up with that would be suitable for him. Then I thought since he was so much into rock music, it would be cool to do a rock theme card for him. I've seen a lot of handmade cards around using the wordings such as "You Rock" on them and electric guitars.....I've been thinking of doing an electric guitar for quite awhile now but never really put my mind to actually doing it till now. So, I tried to find an electric guitar pattern online and traced it on the red and white foam. It was really fun playing with these foams.....and I kinda like using them for my handmade cards these days.

I think the best part about the guitar would be the strings! I sew four strings of silver thread on the foam to make it look like real wire strings hehehe!! That was fun! :) I also did a V-fold pop up on the inside of the card but with a different twist this time because I drew on it a few music notes and stars of different shapes and then cut them out using a craft knife. This type of design can only be done using a craft knife....you can't really achieve something like that using craft punches alone. I enjoyed doing it especially when it's all cut out and you can see through it. :) I decorated it with birthday wordings at the top.

I really hope he likes it as much as I do! He's a great artist and I really admire his artwork. It's nerve wrecking to give someone with such great talent, your own piece of artwork. I wonder what he will say about this birthday card hahaha.....I hope he won't criticize too much! LOL! :)

Pop up Kaabah

H001

I receive a request to do a Haji theme card from a customer who wishes to give this card to her parents when they arrive home from performing their haj next week. I have never done this type of card before so it's a new thing for me to learn.

The first thing that came to my mind was to make a pop up Kaabah for this design. I was thinking of how to go about it and then I searched for pop ups that was in the shape of a box. I went to Extreme Cards and Papercrafting blog to see if there were any samples of such pop ups and luckily there was one! Yay! A closed box pop up! But the box was a bit short and not the kind that I needed to make the Kaabah. So I had to change the size so that it will look a bit similar to it. It was really tough!! I had to do it a few times till I really got it right. Do check out the blog to see the tutorial for a pop up closed up box :).

Pop up computer!

HB044

A pop up computer! Yay! I did it! I couldn't find a sample anywhere on how to make a pop up computer....if anybody out there knows where I can find one, do tell! I had to make this one from scratch....and boy was it hard to do! Arrrggghhh! LOL :)

My customer requested for the card to be in a red or orange color but I decided to combine the two colors instead. The combination of the two colors looks bright and outstanding. Mixed with white and silver too....to add some contrast.

As you can see....I love playing with stripe patterns. Lining strips of papers of different colors with ribbons and gluing them piece by piece, creating a design on the card. It does take time to do it but I love how it turns out in the end.

I didn't decorate much on the pop up computer inside the card....basically I didn't want it to look too overly decorated and it might spoil the whole look of the pop up computer itself.....at the moment that's the idea that I had in mind. Perhaps maybe in future I will come up with something new.....not sure what it will be like though, but hopefully a much better design. :)


Bigger version of V011

V011 (Half A4 size)

This particular design is originally only 10.4cm x 14.7cm in size, but I had to make it on a bigger card as requested by my customer. Basically because of the wordings involved.....I was afraid that the wordings might not be able to fit in clearly and nicely if done on a smaller card.

I did make some changes here and there particularly at the pop up heart inside the card. I added purple hearts which was not available on the original design. The pop up heart itself is done differently as you can compare.....this particular one I did separately from the card and pasted on it. The original design I cut out the heart shape from the soft pink insert paper inside the card thus leaving a big hole behind the pop up heart that can make you clearly see the purple card behind it. So for this new card, I decided it's better to do it separately to make it look more neat. :)

New colour for HB031

HB031a

OK! Been getting a lot of orders for this design....so much so that I ran out of the soft yellowish paper for this card!! hehehe!! So I had to find a similar color of paper that would match the original color of the old design. Finally I found a color that looks a little creamy and it does match with the gold, peach and pink paper. So I guess from now onwards if anybody wants to purchase this HB031 design, this is what it will look like from now on.....I also made the stripe design at the bottom of the card with small ribbons combined with the color paper strips......and I also added soft pink 7 pop up flowers inside it. But if you don't like the pop up flowers, it can be done without them.....just let me know and I will not add them in it. :)

I made this card for my Mom's friend who celebrated her 77th birthday......she was super excited about it.....and even more so when she received a bouquet of flowers that matches the color of the flowers on the card. hehehe! What a coincidence it was that the two match each other.....it was not planned at all......I'm just happy that she loved it.....it's all that matters :)

Pop up house! ;)

HB043

This is one of pop up projects that I have wanted to do since I moved back to Alor Setar. I saw a video of how to make a pop up house on Youtube a few months back. Ever since then I've been thinking of doing it, and when my regular customer ordered a birthday card for her mother with a theme that's related to home sweet home....I took the opportunity to make this pop up house for her.

The ideas for the design just came during the process of making the card itself.....I just added them bit by bit as I go along. My customer already had in mind what she wanted for the design of the card....for example, her mother loves to garden and loves her chickens too. So I thought why not make a simple garden and add some chickens, butterflies, birds and some blue clouds to make it look cheerful. :) As for the design on the inside, I just made the pop up cottage house and added a pathway with bushes and flowers along it :). Most of the shapes I pasted on the card are done by hand using plain scissors except for the flowers, butterflies and one of the leaf that I used craft punches. The rest like the clouds, birds, the long leaves, bushes are done by cutting them up using plain scissors. The most interesting part of the pop up house for me would be the roof! Why? Because I pasted layers and layers of scallop patterned paper on it to make it look like a roof for the house. I really love that part. :)

It's funny how many months ago I thought that this pop up house was so hard to do. Now that I have tried making it I realized that it's not that hard after all. You just need to follow the pattern correctly and things will fall into place. :)

Love is in the air! ;)


VO16

Love is in the air people!!! Yup! It sure is! ;) I love this card, even though it looks so simple. But in reality it's not as simple to make as it looks. There is something about it that's kinda complicated to do. Can you guess what it is? hehehe! Well, it's those teeny tiny heart shapes that I had to arrange one by one and make it look like they are flying away from the pink foam heart shape balloons. That was really time consuming, especially since the size was so small....imagine how difficult it was to glue it on the card :). Yes indeed, it was a tough job! But someone had to do it! LOL! :D

This card is also a request from a regular customer of mine. She did gave me a lot of time to finish this and I appreciate it very much as I don't have a lot of time to do custom made orders these days. Another thing that is special about this card is the "bling bling" that was added to the pink foam heart shapes to give it that special touch. It was her idea to add them on the card. I just had to figure out how to do that hehehe....I didn't have much of bling bling in stock, those you see on the card was all I had available with me. LOL! I need to get more soon, if I can find it here in Alor Setar. Hopefully they are available here.

The card is half the size of an A4 paper and comes with a matching soft pink envelope that I adore because of the heart shape and cloud design at the back of the envelope. It think it's cute! hehehe! LOL! I wish I could show you guys the design I did on the inside of the card but I can't because there is a private message for the receiver from my customer inside it. So unfortunately I can't share that to the world....huhuhu...sorry guys! :( Anyways, what I can tell you is that there are wordings inside it that says, "Love is in the air"... :)

Lawyer's Robe.....

MBL080

Gosh....this was an interesting project :) I've never done a lawyer's robe before and was requested to make one. As most of you know....I don't do custom made designs anymore, I try not to take them anymore due to the time constraint. But since I had some time in my hands recently I was able to take this order. Times like this I wish I have a much more interesting variety of materials to use to make miniature clothes....so since I don't have any, I had to resort to using paper instead. It's a simple design.....clean cut and smart. That's the objective. I hope I managed to achieve that look. :)


Pop up Christmas tree!

CD004 (NOT FOR SALE)

As usual when it comes to making pop up cards, I am always excited! hehehe! This is another pop up design that I have been thinking of doing for quite sometime now. I finally did it in the end. There were a few pop up Christmas tree designs to choose from but I picked to do this one first, mainly because the pop up Christmas tree will match the craft punch Christmas tree design on the card. The pop up Christmas tree was a tough one to make mainly because I had to arrange one by one those tiny craft punch fern leaf on it....with three shades of green color too. I wish I could have glued on more of it to hide the white background but I got tired! LOL! :D

This is the first time I'm using this craft punch as well. I was thinking really hard of how to arrange the small Christmas trees on the card and finally this is what I came up with. It's really simple.....and I place the white flower sequin in between them to symbolize snowflakes heheheh!

Another thing that I would like to mention here is the small white foam squares I arranged one by one around the wordings on the card. I had fun doing that! LOL! It's suppose to symbolize snow but it looks like marshmallow to me! hahaha! Oh well! I still love that bit of design though! :).

Best wishes....

BW001

I am pretty excited about this new design :) I was experimenting with another one of my new flower and leaf craft punch again. Gosh....I think I've bought quite a lot of craft punches this year hehehe.....oh well! The reason why I did that was because I noticed that if I don't buy them when those particular designs are available, the next time I want to buy them at the craft shop, they're sold out!! So better get them while they are still available in stock! hehehe....

What I love about the design this time is the medium sized black and red ribbon. It has a beautiful design on it. Quite expensive though......huhuhuhu.....but I bought it anyways, couldn't help myself!! hahaha! I try to play with the colors that are available on the ribbon and find papers that match it. The stripe design below the ribbon are actually strips of black and red paper that I glued on to the card piece by piece. It was very tricky and I needed to make sure that it is glued on it properly and looks neat and straight.

The wordings "Best Wishes" was actually made using a rubber stamp that I bought a long time ago.....I never used it before in my card designs....but now that I have the ink pads, I can try it. Fun! :)

The pop up inside the card is a simple pop up......a box pop up I made which I later pasted with a pot of flower arrangement that I made using the same flower and leaf craft punch. I layered the three colored paper flowers together and added the leaves in between....it was kinda tricky to make the flower arrangement....but it worked out in the end. Phew! :)

Pop up birthday cake!

HB042

OK! Here's the bright orange, dark pink and white card I was telling about! hehehe! I must say I love making this design :) You know why? Because I finally get to experiment with my new clear stamps! Yay! I receive them as gifts from a dear friend of mine. She's so sweet! I had loads of fun stamping the designs on paper. The best thing about clear stamps is that you can adjust the patterns that you wish to stamp on paper, meaning that you can see through the stamp itself right on the paper. It's just so much fun! Right now I wish I have more different color ink pads to match my designs. I will get some when I go to KL hehehe....coz I can't seem to find any here in Alor Setar.

I also added a pop up birthday cake inside the card. I've never done this before and it was fun! It's not that hard to do after all.....the only thing that I wish I had done more is to decorate the cake hehehe......I made it quite simple with lots and lots of candles. Yup there are quite a number of candles there....on each one of them. :)

Featured Post

How to make two tone tear drop shape quilling flowers

We are coming close to mid February and I'm blogging about something that I did last January! LOL! It's been a month sin...